Making of a continous bound placket
This technique is used for the sleeves of Oxanne dress.
At the end of this article, I tell you how to modify the bottom edge of the sleeve in order to enlarge it.

The principle of this technique is to enclose the sharp edges of the cut (at the bottom of the sleeve) in a bias tape. I give you a method but there are surely others, use the one that suits you best.
You need your sleeve and a bias tape 3 cm (1 3/16 in) wide and 2 times the length of the cut on the sleeve (here 12 cm (4 3/4 in) total).

- Cut the bottom edge of the sleeve.
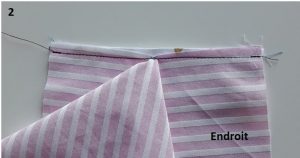
- Place sleeve and bias tape towards you (“Endroit” = right side). Place the opening on the bias tape. The two pieces must be edge to edge but the middle of the cut may go down a few millimeters to avoid pinching the fabric in the seam (see photo 2).
- Stitch 0,5 cm (3/16 in) from the edge of the bias tape.
- Turn bias tape towards the top. Press seam allowance towards the bias tape. (“Envers” = wrong side)


- Fold bias tape towards its center. Press. Fold again. The first seam must be covered by the second pleat. (see photo 6).


- Stitch at the edge of the folded bias tape. Press.

- Fold the sleeve, right sides together, bias out. Replier votre manche endroit contre endroit, en faisant ressortir le biais. Make an oblique seam on the tip of your bias, without taking the sleeve in the seam.


- Press. Fold towards the inside the piece of bias tape wich is on the longer side of the sleeve bottom edge. Stitch 0,5 cm (3/16 in) from the edge. You can also sew along the bias (red dashes, photo 13).


Bonus
This scheme shows you how to modify pleats position at the bottom edge of the sleeve (if you need to enlarge it).
Decrease the width of the pleats by taking an initial mark closer to the final mark, which must not move (see diagram). Take into account these changes to cut cuffs. When new pleats are done, stitch 0,5 cm (3/16 in) to the edge.
